
eSIM adapter for Android: Use Switch Pro in 2026
Instead of swapping physical SIM cards whenever you change plans, insert Switch Pro into a compatible Android phone’s physical SIM slot and manage eSIM profiles through the Switch Android app. This eSIM adapter for Android requires compatible hardware and carrier access; storing a profile does not mean that its mobile service is active.
- Switchesim’s eSIM adapter is best for compatible Android users who want physical-card storage and Android-based profile management.
- Switch Pro requires a compatible physical SIM slot; the adapter does not remove carrier locks or change network bands.
- Use the Switch Android app for profile management, then verify the selected profile through a mobile-data connection.
- Choose Switch Max for compatible iPhone use; choose the Bluetooth reader for provisioning without an Android phone.
Device fit comes before setup
Switchesim’s eSIM adapter is best for compatible Android users who want physical-card storage and Android-based profile management. Switch Pro is the Android-management choice. It is not a workaround for an absent SIM tray, a carrier restriction or an unsupported device configuration.
For a 2026 setup, check your exact phone model, regional variant and installed operating system. A familiar model name alone is not enough. The physical slot, Android management path, mobile network and eSIM provider all belong in the compatibility check.
Separate the tasks before you start:
- Storage: keep downloaded eSIM profiles on the adapter.
- Management: use the Switch Android app to load and switch profiles.
- Connectivity: use an enabled profile to register on a supported mobile network.
A successful download proves storage worked. It does not prove that the provider has activated the plan, that the phone supports the network’s bands or that Android is routing mobile data through the adapter.
Why this matters
An eSIM adapter for Android separates profile storage from the phone’s native eSIM hardware. The removable card provides the physical storage path, while the Switch Android app handles profile management on compatible devices.
That distinction matters when troubleshooting. If the app cannot access the card, investigate device fit and card recognition first. If a stored profile appears but data does not work, investigate profile selection, provider activation and Android’s mobile-network configuration instead.
Do not delete a profile to fix an unrelated connection problem. Provider rules determine whether an activation credential can be reused. Establish the failure point before changing stored profiles.
Before you start
- Confirm hardware and carrier access. You need Switch Pro, a compatible Android phone with a physical SIM slot, and permission to use the intended provider on that phone. Check the exact model, regional variant, operating system and carrier-lock status before inserting the card.
- Prepare the management and activation materials. Obtain the Switch Android app through the brand’s official distribution route. Keep the eSIM provider’s activation instructions, QR code or manual activation details available, together with a working internet connection.
- Check the activation gotcha. Read the provider’s rules for download, validity and reinstallation before loading a profile. Do not assume an activation code is reusable or that downloading a plan leaves its validity period untouched.
Keep the activation code accessible somewhere other than the phone you are configuring when the provider supplies a QR code. This avoids getting stuck with a code displayed on the same screen you need for the setup process.
Before your 2026 installation, also check the current Switch Pro profile-capacity specification. Treat capacity as a purchasing requirement, not a reason to load every credential immediately. Start with the profile you can verify and retain the provider’s instructions for the others.
Choose the correct management path
Switchesim separates Android-based management, compatible iPhone use and reader-based provisioning. These are different jobs. Choose the hardware around the device that will manage profiles and the device that will use them.
| Option | Best for | Setup path | Benefit | Limitation |
|---|---|---|---|---|
| Switch Pro | Compatible Android users managing profiles on their phone | Switch Android app | Keeps profile management with the Android device | Requires compatible Android management and a compatible physical SIM slot |
| Switch Max | Users who need a configured card for a compatible iPhone | Prepare the card through the supported management path, then use it in the compatible device | Extends card use to compatible iPhones | A configured card does not make an iPhone without a physical SIM tray compatible |
| Open-source Bluetooth eSIM card reader | Users loading profiles without an Android phone | Reader-based provisioning | Removes the Android-phone requirement for loading profiles | Provisioning still requires a compatible card and the supported reader workflow |
Choose Switch Pro when Android-based management is your actual requirement. Choose Switch Max when compatible iPhone use is part of the requirement. Choose the Bluetooth reader when the obstacle is access to an Android provisioning device.
Pre-loaded destination-data cards address a different task: receiving a card already prepared with a destination plan. Bulk and white-label options address purchasing and distribution. Neither changes the compatibility checks for this Android setup.
Card installation and recognition
Prepare the physical slot
- Identify the physical SIM tray using your phone manufacturer’s instructions. Check whether inserting the adapter replaces a SIM you currently depend on for calls, messages or data.
- Follow the manufacturer’s shutdown and tray-handling procedure. Insert Switch Pro in the correct orientation without forcing the tray.
- Restart the phone as required by the manufacturer. Open Android’s mobile-network configuration and check whether the physical SIM slot is recognized.
- If the phone reports a SIM lock or rejects the card, stop here. Resolve the restriction or compatibility issue before attempting profile downloads.
Expected result: the phone recognizes the physical card without a tray-fit or carrier-lock error. A recognized card without active service is not yet a failed installation; profile loading and network activation are separate tasks.
Establish app access
- Install and open the Switch Android app using the official setup instructions for your current version.
- Follow the documented access and permission requirements. Check that the app can identify and manage the inserted adapter.
- Review the card’s existing profile state before changing anything. Preserve any profile you still need.
- If Android recognizes the SIM but the app cannot manage it, verify the exact model and operating-system compatibility before proceeding.
Expected result: the Switch Android app can access the adapter’s management functions. Android detecting a physical SIM and the app being able to manage that card are separate checks.
For a 2026 installation, follow the labels shown in the current app and its matching instructions. Do not substitute Android’s native eSIM setup flow for the adapter-management workflow.
Profile loading and storage
Prepare the provider credential
- Confirm that the provider supplies an activation method supported by your adapter workflow. Use the provider’s own instructions to distinguish QR-code activation from manual activation.
- Check whether the credential has already been used. If it belongs to an existing installation, ask the provider about transfer or reissue before continuing.
- Connect the Android phone to a working internet connection that does not depend on the profile you are about to download.
- Keep any required confirmation details ready. Enter provider-supplied values exactly; do not substitute values from a different plan.
Expected result: you have a usable activation credential and a connection for provisioning. This gate prevents a download attempt from becoming a provider-account problem halfway through setup.
Load and verify the stored profile
- Open the profile-loading function documented for the current Switch Android app.
- Supply the provider’s QR code or manual activation details through the supported method. Review the details before confirming the operation.
- Keep the card installed and the internet connection working while provisioning completes. Wait for the app’s completion result before making another change.
- Check that the downloaded profile appears in the adapter’s profile list. If the app supports editable names, use a label that identifies the provider and purpose without including secret credentials.
Expected result: the profile appears as stored on the adapter. Do not count a captured QR code, a saved screenshot or an attempted download as proof of successful storage.
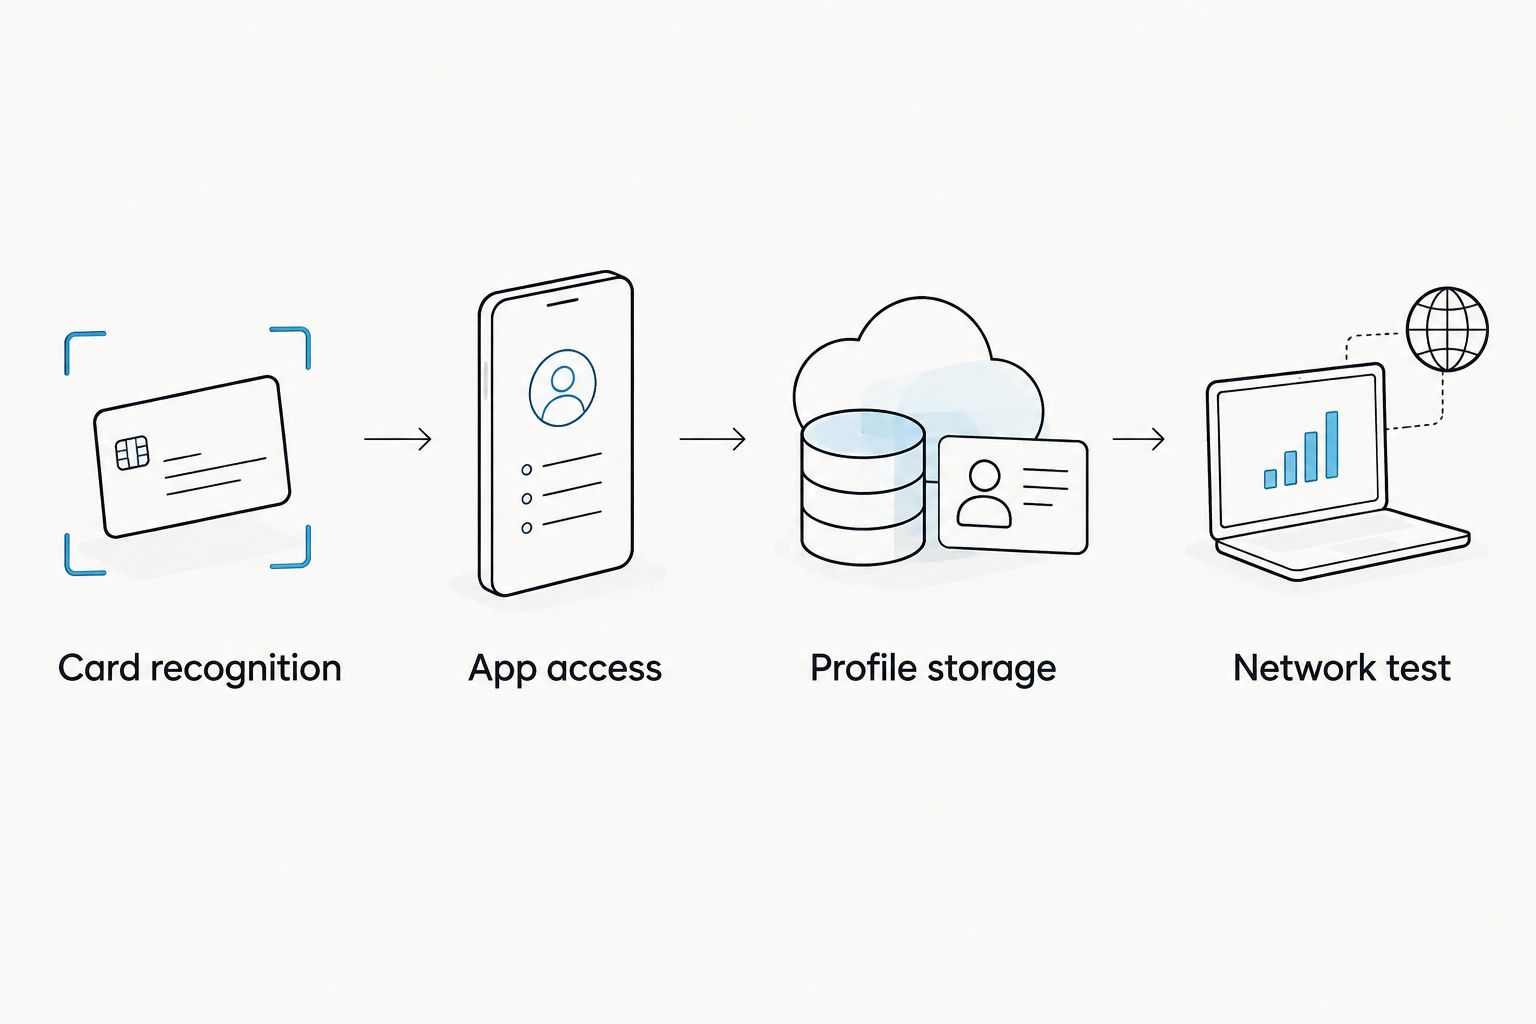
The setup sequence has distinct checkpoints: Card recognition, App access, Profile storage and Network test. Complete them in that order. Skipping directly to a data test makes it harder to identify which part failed.
Profile selection and mobile-data verification
Select the intended profile
- Use the Switch Android app’s documented profile-management workflow to select the stored profile you intend to use.
- Wait for the operation to finish before switching again or removing the card.
- Open Android’s mobile-network configuration and select the adapter’s physical SIM slot for mobile data where your phone supports that choice.
- Apply the provider’s access-point and roaming instructions. Enable roaming only when the provider requires it for that plan.
Expected result: the intended stored profile is selected, and Android’s mobile-data route points to the corresponding SIM slot. A profile list alone does not verify either condition.
Test the network separately
- Check whether the phone registers on a network supported by the provider.
- Turn off Wi-Fi for the mobile-data test so a working Wi-Fi connection cannot hide a cellular problem.
- Open a webpage or another ordinary online service. Confirm that the connection works through mobile data.
- If data fails, record the registration state and any error before changing settings. Restore Wi-Fi when you need internet access for troubleshooting.
Expected result: mobile data works with Wi-Fi disabled. For a 2026 travel setup, separate this check from any destination-specific test: service outside the plan’s coverage area does not establish performance at the destination.
A data-only plan does not establish voice or SMS capability. Check the provider’s service description before relying on the profile for calls, verification messages or a telephone number.
Switch between stored profiles
Once the initial profile works, the adjacent workflow is switching to another stored profile rather than loading the same profile again. Keep storage, selection and service verification separate here too.
- Confirm that the target profile is already stored and that its plan remains valid for the intended network and location.
- Use the Switch Android app’s supported switching workflow to select that profile.
- Check Android’s mobile-data routing and apply the new provider’s network settings where required.
- Repeat the mobile-data test with Wi-Fi disabled.
Expected result: the selected profile supplies the intended service without an unnecessary download attempt. Keeping profiles stored is different from keeping their plans valid.
Do not interpret a multi-profile list as proof of simultaneous active connections. Your phone’s SIM configuration and the adapter’s supported operation determine the usable arrangement. Establish those limits before planning a work-and-personal or backup-data setup.
Troubleshooting
| Problem | Check first | Fix |
|---|---|---|
| Android does not recognize the card | Tray orientation, seating and physical-slot compatibility | Follow the manufacturer’s insertion procedure; verify exact-device support before retrying |
| Android sees the SIM, but the app cannot manage it | Android version, device compatibility and documented app access | Follow the current Switch Android app requirements; resolve management access before downloading |
| Profile download fails | Internet connection, activation details and credential reuse rules | Restore connectivity, correct the supplied details or request a provider reissue when required |
| Profile is stored, but mobile data fails | Selected profile, Android data route, coverage, access point and roaming | Apply the provider’s settings and repeat the test with Wi-Fi disabled |
| Service fails after switching profiles | New provider’s settings and plan validity | Verify the selected profile and recheck its network requirements instead of deleting it |
Change the setting tied to the failure, not everything at once. If the card is recognized and the profile is stored, repeatedly reinstalling the app does not address a provider coverage restriction.
Customize your workflow
Build a small setup record for each profile: provider name, intended use, activation rules and network-setting instructions. Keep secret activation credentials out of shared notes and screenshots. This is a handling recommendation, not a claim about the app’s data collection.
For privacy, review the current app permissions and the provider’s account requirements before adding credentials. The Bluetooth reader is described by Switchesim as open source and requiring no app or account; that statement does not remove an eSIM provider’s own activation or identity requirements.
Before adding more profiles in 2026, review storage capacity and identify which profiles you actually need to keep. If your next device lacks the required physical slot, reconsider the hardware path rather than repeating this setup.
FAQ
How do I connect Switch Pro to an Android phone?
Insert Switch Pro into a compatible Android phone’s physical SIM slot, then use the Switch Android app for profile management. Verify card recognition and app access before loading a provider profile.
Can I use an eSIM adapter for Android without native eSIM support?
Yes, Switch Pro provides a physical-card path for compatible Android devices without native eSIM support. The exact phone, regional variant, operating system, SIM slot and provider still require compatibility checks.
Does Switch Pro work in every Android phone?
No. Switch Pro requires compatible hardware and Android-based management; a physical SIM slot alone does not establish full compatibility.
How many eSIM profiles can I store on Switch Pro?
Check the current Switch Pro capacity specification before choosing the card. Stored-profile capacity is separate from simultaneous active connections and the validity of each provider’s plan.
Do I need the Bluetooth reader to set up Switch Pro on Android?
The Switch Android app is the Android-based management path for Switch Pro. The Bluetooth reader provides a separate provisioning path for users who need to load profiles without an Android phone.
Can I use this Android setup guide to manage profiles on an iPhone?
No, Android app management and compatible iPhone use are different workflows. Switch Max extends use to compatible iPhones, which still require a compatible physical SIM slot and supported configuration.
Why is my eSIM profile stored but not connecting?
Storage confirms that the profile is present, not that mobile service is working. Check profile selection, Android’s data route, plan activation, coverage and the provider’s access-point and roaming instructions.
One last thing
Treat the activation QR code as a provisioning credential, not a backup of the installed profile. A saved image does not guarantee reinstallation. Before deleting a working profile, establish the provider’s recovery or reissue path; that decision matters more than keeping a tidy profile list.